In this article, I want to tell my story of building an efficient data export feature with Hasura, TypeScript, and Next.js. Not exactly a complex feature, but I can see where people might shot themselves in the foot. I know because I did, and only to find out not to was not that hard.
The Story
I was working on a project that required me to export a large amount of data from a database to a CSV file. The data is stored in a PostgreSQL database, and I want to export it to a CSV file. Users might export their data multiple times, and they might do it concurrently, while we want to keep the instance running as cheap as possible. So memory limit is a concern here.
Preliminary Knowledge
The project I was working on is a web application that uses the following tools, so I’ll be using them in this article:
- Hasura - A GraphQL engine that gives you instant GraphQL APIs over Postgres.
- TypeScript - A typed superset of JavaScript that compiles to plain JavaScript.
- Next.js - A React framework for building server-side rendered and static web applications.
- Node.js - A JavaScript runtime built on Chrome’s V8 JavaScript engine.
I will be using the following tools to help me along the way:
- Docker - A tool designed to make it easier to create, deploy, and run applications by using containers.
- PostgreSQL - A powerful, open source object-relational database system.
You don’t need to be an expert in any of these tools to follow along, but it would be helpful if you have some basic knowledge of them. Regardless, I will try to explain everything as I go.
Setting Up the Project
I will be using Docker & Docker Compose to set up the project. If you don’t have Docker installed, you can follow the instructions here to install it.
To keep things short, you can clone the example project from here. The project is a simple Next.js application that uses Hasura as the low-code backend connected to a PostgreSQL database.
The project structure looks like this:
tree -L 2 .
.
├── Dockerfile
├── api
│   ├── config.yaml
│   ├── metadata
│   ├── migrations
│   └── seeds
├── docker-compose.yml
├── next-env.d.ts
├── package.json
├── src
│   └── pages
├── tsconfig.json
└── yarn.lock
To run the database and the Hasura GraphQL engine, run the following command:
docker-compose up -dThis will start the database and the Hasura GraphQL engine in the background. To check if they are running, run the following command:
docker-compose psRetry the command if hasura did not start yet. It might have failed to start because the database is not ready yet.
You should see a similar output if everything is running:
NAME                                         IMAGE                           COMMAND                   SERVICE             CREATED             STATUS                   PORTS
hasura-export-csv-example-graphql-engine-1   hasura/graphql-engine:v2.19.0   "/bin/sh -c '\"${HGE_…"   graphql-engine      4 minutes ago       Up 4 minutes (healthy)   0.0.0.0:8080->8080/tcp
hasura-export-csv-example-postgres-1         postgres:12                     "docker-entrypoint.s…"    postgres            4 minutes ago       Up 4 minutes             5432/tcp
You can now access the Hasura console at http://localhost:8080/console.
Reproducing the Problem
With hasura, you don’t need to write a lot of code to get a GraphQL API up and running. You can use the console to manage your database models and various backend configurations. In this article, we’ll just load the necessary migrations and metadata to the local hasura instance we set up earlier.
To do that, run the following command:
cd api
hasura metadata apply
hasura migrate apply
You should see a similar output:
✔ Applying metadata...
✔ Metadata applied
✔ Applying migrations...
✔ Migrations applied
Now, you should be able to see the forms and responses tables in the Hasura console. We’ll be using these tables to reproduce the problem. To open the console, run the following command:
hasura console --admin-secret myadminsecretkey --endpoint http://localhost:8080These tables should resemble the following diagram:
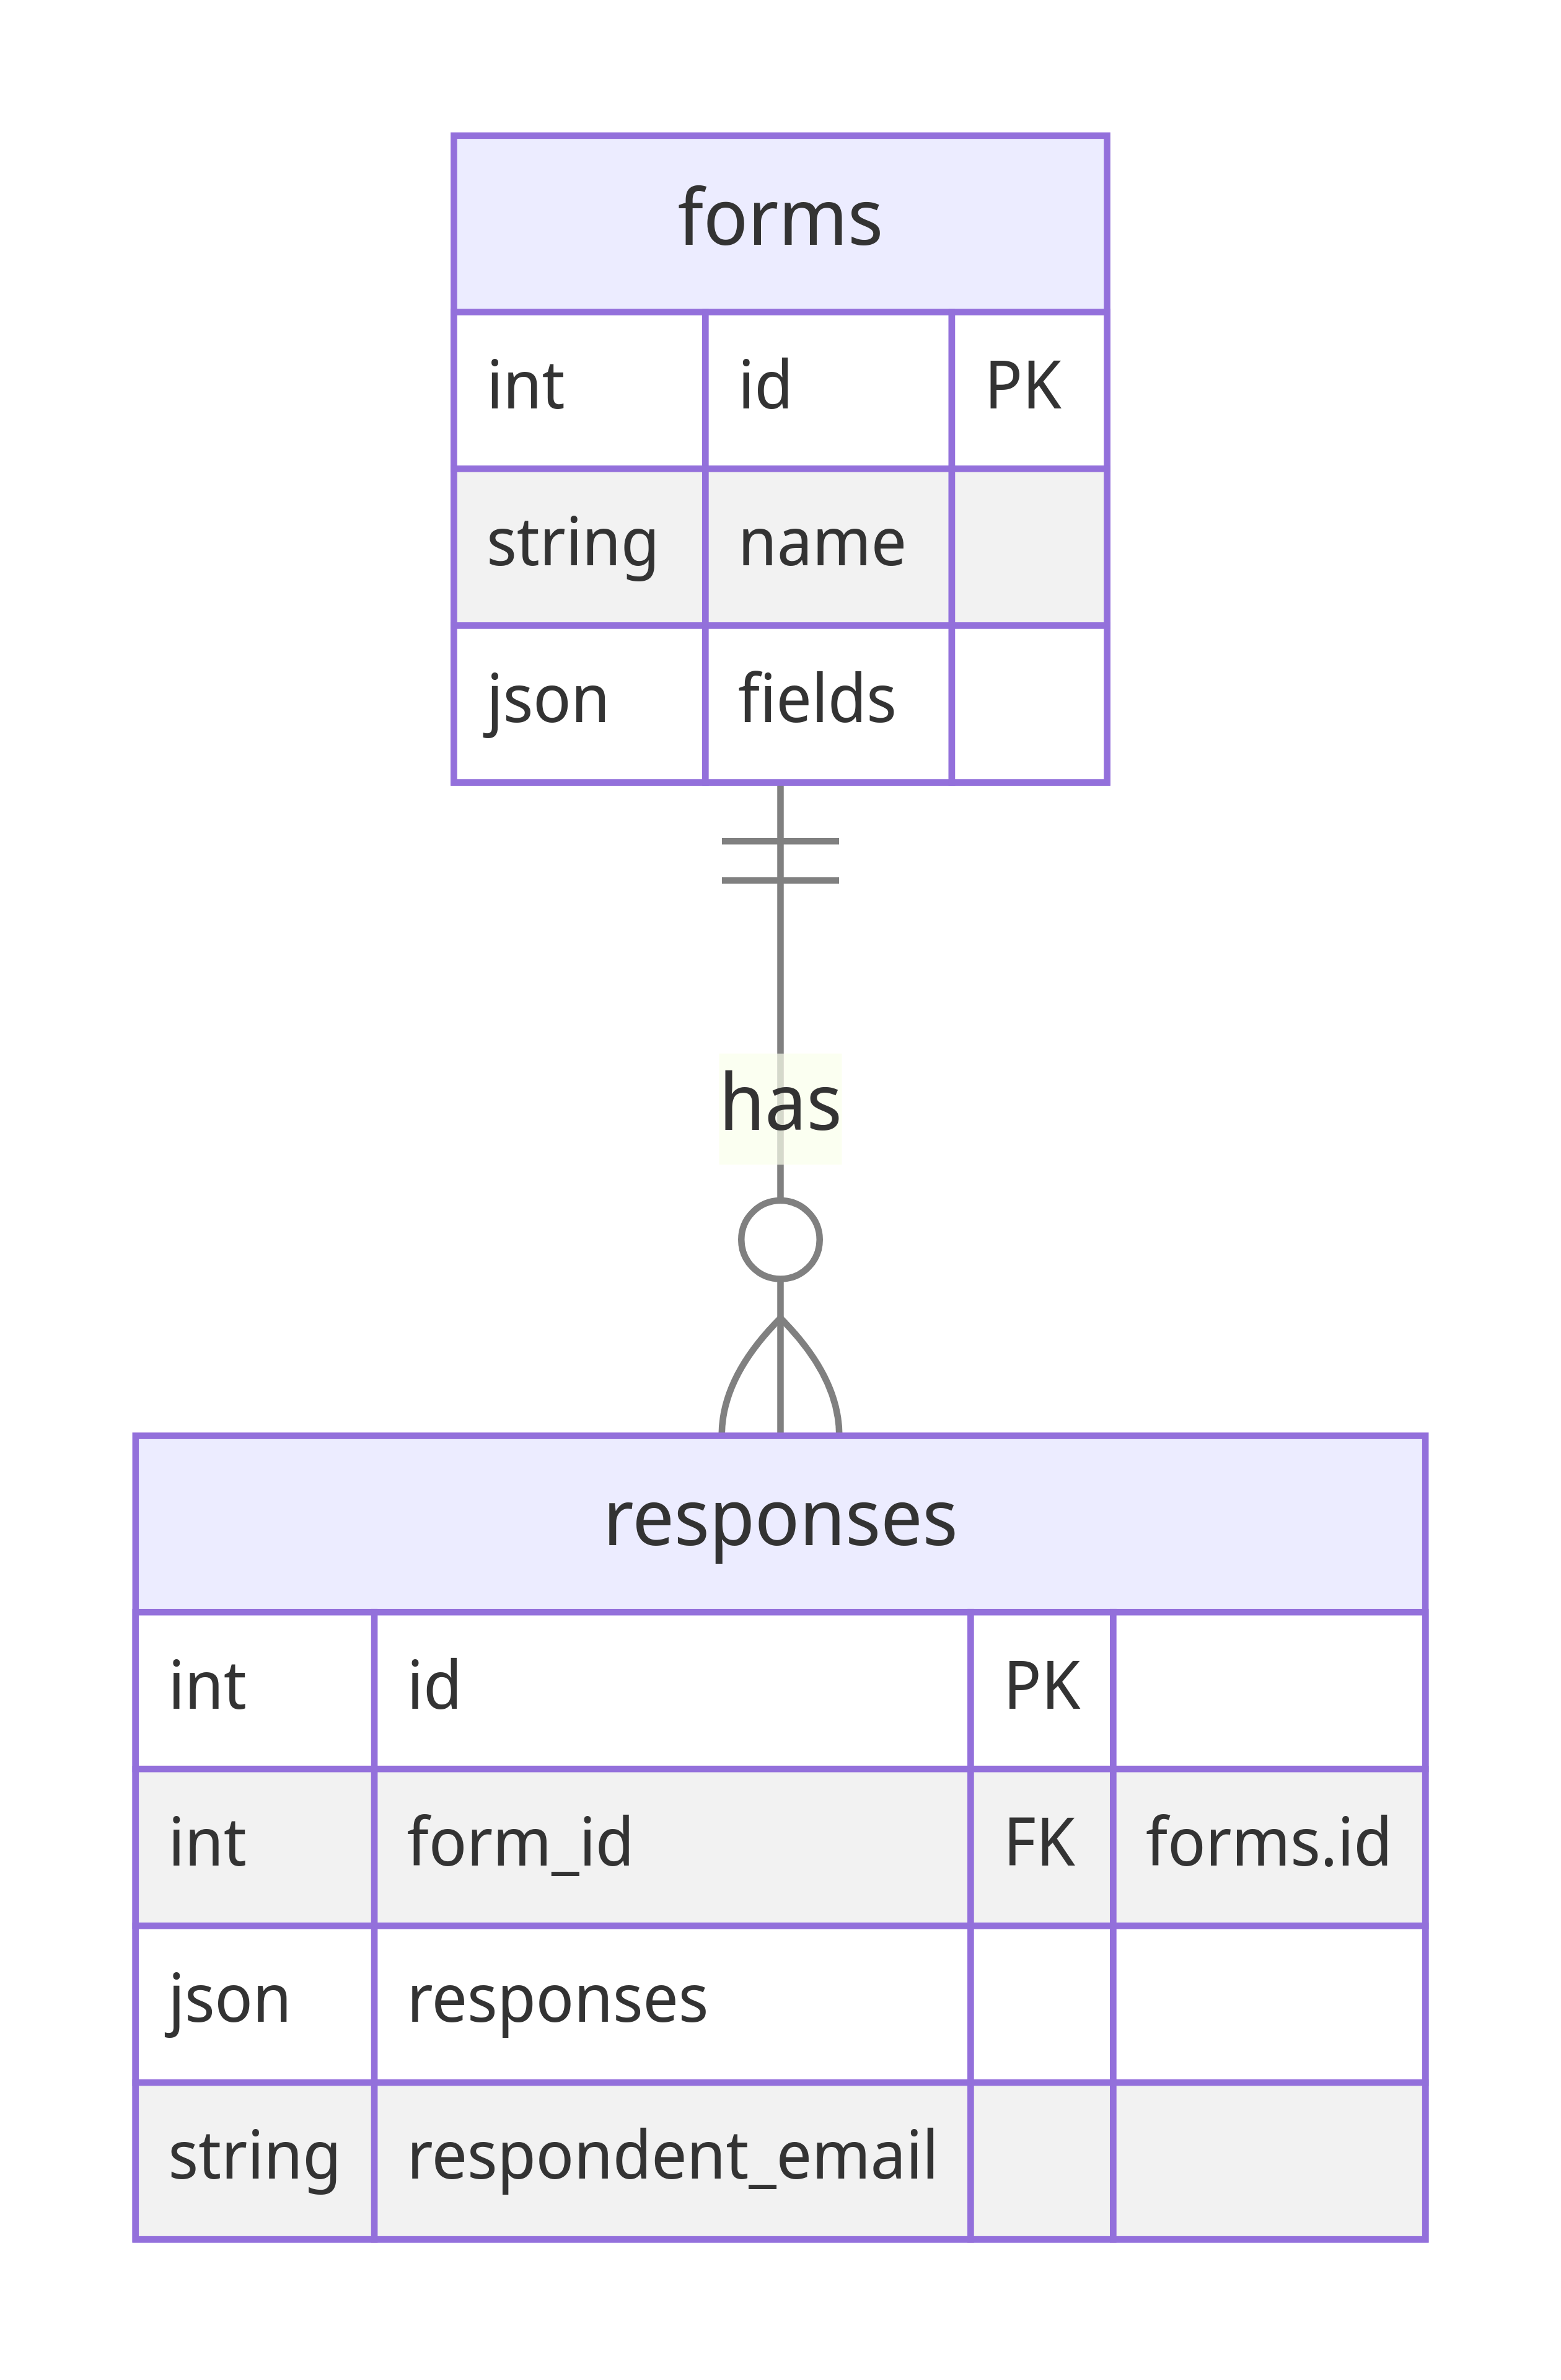
The forms table stores the form data, while the responses table stores the responses to the forms.
I’ll add a little context here, each form has a set of fields, and each response has a set of responses to those fields. I’ll give you an example:
a form with the following fields:
{
  "id": 1,
  "name": "Form 1",
  "fields": {
    "name": {
      "type": "text",
      "label": "Name"
    },
    "birthday": {
      "type": "date",
      "label": "Birthday"
    }
  }
}
has the following response(s):
[
  {
    "id": 1,
    "form_id": 1,
    "responses": {
      "name": "John Doe",
      "birthday": "1990-01-01T00:00:00.000Z"
    },
    "respondent_email": "[email protected]"
  }
]
Now that we have the tables set up, let’s add some data to them. I created a simple script to add some dummy data to the tables. You can trigger them by calling this http endpoint: http://localhost:3000/api/generate_responses. You should see a similar output:
{
  "id": 1
}
This means that the script has successfully added a form with the id of 1 and 100 responses to that form. You can check the data in the Hasura console.
What do we want to achieve?
Simple, users should be able to export their data to a CSV file by accessing the following endpoint: http://localhost:3000/api/1/export. The endpoint should return a CSV file containing the data of the form with the id of 1. The CSV file should look like this:
id, Name, Birthday
1, John Doe, 1990-01-01T00:00:00.000Z
2, Jane Doe, 1990-01-01T00:00:00.000Z
And there’s this but: memory is limited to 256MB, the environment is read-only docker container, and we might want to avoid using any cloud storage services to keep things simple.
With these constraints in mind, how do we keep the server from crashing when multiple users trigger not-that-small CSV exports simultaneously?
The Proposed Solution
To solve the problem, we need to find a way to export the data without consuming too much memory. We can do this by streaming the data to the client using HTTP response streams.
The principle behind HTTP response streams revolves around data transmission in manageable chunks, as opposed to processing the entire data set at once - a naive solution when handling large volumes. With this method, we send data incrementally, release those data from memory as soon as it’s sent, and repeat the process until all data has been sent. This approach allows us to keep the instance from acquiring more memory than it has available, thus preventing the server from crashing.
Implementation Details
For the implementation, we first turned to a helpful ally in the npm ecosystem: a CSV formatting library capable of transforming data into a readable CSV stream. We chose the @fast-csv/format library for its simplicity and ease of use.
yarn add @fast-csv/formatOur data retrieval process utilized a cursor-based query, which we designed to recursively read data from the lowest ID to the highest. This systematic and incremental approach aligned perfectly with our goal of processing and sending data in chunks, making it a fitting solution for our challenge.
Once we received the data and converted it into a CSV stream, we utilized the response object to send these CSV chunks to the client through HTTP response stream.
import type { NextApiRequest, NextApiResponse } from "next";
import { format } from "@fast-csv/format";

// set up the graphql client
const graphqlClient = new GraphQLClient(
  "http://graphql-engine:8080/v1/graphql",
  {
    headers: {
      "x-hasura-admin-secret": "myadminsecretkey",
    },
  }
);

const PAGE_SIZE = 100;

const getResponses = async (formID: number, cursor: number) => {
  const query = gql`
    query GetResponses($formID: Int!, $cursor: Int!, $limit: Int!) {
      responses(
        where: { form_id: { _eq: $formID }, id: { _gt: $cursor } }
        limit: $limit
        order_by: { id: asc }
      ) {
        id
        responses
      }
    }
  `;
  const variables = {
    formID,
    cursor,
    limit: PAGE_SIZE,
  };
  const data = await graphqlClient.request<{
    responses: { id: number; responses: Record<string, any> }[];
  }>(query, variables);
  return data.responses;
};

// define the cursor-based query to fetch the data
const fetchAllResponses = async function* (formID: number) {
  let cursor = 0;
  while (true) {
    const responses = await getResponses(formID, cursor);
    if (responses.length === 0) break;
    cursor = responses[responses.length - 1].id;
    yield responses;
  }
};

// define the function to fetch the form data
const getForm: (formID: number) => Promise<{
  id: number;
  fields: Record<string, any>[];
}>;

export default async function handler(
  req: NextApiRequest,
  res: NextApiResponse
) {
  const { form_id, stream } = req.query;
  const formID = parseInt(form_id as string);
  const form = await getForm(formID);
  const fieldsArray = Object.entries(form.fields);
  const csvStream = format({
    headers: ["id", ...fieldsArray.map(([name, field]) => field.label)],
    writeHeaders: true,
  });

  res.setHeader(
    "Content-disposition",
    `attachment; filename=${form.id}_${new Date().toISOString()}.csv`
  );
  res.setHeader("Content-type", "text/csv");
  csvStream.pipe(res);

  for await (const responses of fetchAllResponses(formID)) {
    for (const r of responses) {
      csvStream.write([
        r.id,
        ...fieldsArray.map(([fieldName]) => r.responses[fieldName] ?? ""),
      ]);
    }
  }
  csvStream.end();
}
I’ll try to explain the code above as I go. First, we define the cursor-based query to fetch the data. This query will fetch the data in chunks, let’s say 100 rows at a time, and we’ll use it to fetch the data in the loop. I did it by using async generator functions to keep the reference to the cursor as we loop through the data. Next, we define the function to fetch the form data. This function will fetch the form data, and we’ll use it to get the form fields. Then, we define the handler function. This function will be called when the user triggers the CSV export. Inside the handler function, we first get the form data and the form fields. Then, we create a CSV stream using the @fast-csv/format library. Next, we set the response headers to tell the browser that we are sending a CSV file. Then, we pipe the CSV stream to the response object. After that, we loop over the async iterable objects returning from the cursor-based query. Inside the loop, we loop through the responses and write them to the CSV stream. Finally, we end the CSV stream.
Testing the Solution
For a fair and comprehensive evaluation of our innovative streaming solution, we need to construct the naive solution and place them side-by-side. So, let’s roll up our sleeves and dive into the process!
First, we’ll build the naive solution, which involves a straightforward process of querying all the necessary data, transforming it into a full CSV using the same library, and sending it over to the client in one go. Despite its simplicity, its performance under high loads remains an untested variable. So, we withhold our judgments, for now.
const fetchAllResponsesAtOnce = async (formID: number) => {
  const query = gql`
    query GetResponses($formID: Int!) {
      responses(where: { form_id: { _eq: $formID } }) {
        id
        responses
      }
    }
  `;
  const variables = {
    formID,
  };
  const data = await graphqlClient.request<{
    responses: { id: number; responses: Record<string, any> }[];
  }>(query, variables);
  return data.responses;
};

export default async function handler(
  req: NextApiRequest,
  res: NextApiResponse
) {
  const { form_id, stream } = req.query;
  const formID = parseInt(form_id as string);
  const form = await getForm(formID);
  const fieldsArray = Object.entries(form.fields);
  const csvStream = format({
    headers: ["id", ...fieldsArray.map(([name, field]) => field.label)],
    writeHeaders: true,
  });

  if (stream === "true") {
    res.setHeader(
      "Content-disposition",
      `attachment; filename=${form.id}_${new Date().toISOString()}.csv`
    );
    res.setHeader("Content-type", "text/csv");
    csvStream.pipe(res);
    for await (const responses of fetchAllResponses(formID)) {
      for (const r of responses) {
        csvStream.write([
          r.id,
          ...fieldsArray.map(([fieldName]) => r.responses[fieldName] ?? ""),
        ]);
      }
    }
  } else {
    const chunks: Buffer[] = [];
    csvStream.on("data", chunk => {
      chunks.push(chunk);
    });
    csvStream.on("end", () => {
      const buffer = Buffer.concat(chunks);
      res.setHeader("Content-length", buffer.length);
      res.setHeader(
        "Content-disposition",
        `attachment; filename=${form.id}_${new Date().toISOString()}.csv`
      );
      res.setHeader("Content-type", "text/csv");
      res.send(buffer);
    });
    const responses = await fetchAllResponsesAtOnce(formID);
    for (const r of responses) {
      csvStream.write([
        r.id,
        ...fieldsArray.map(([fieldName]) => r.responses[fieldName] ?? ""),
      ]);
    }
  }
  csvStream.end();
}
The only difference between the naive solution and the streaming solution is the stream query parameter. If the stream query parameter is set to true, we’ll stream the CSV data to the client. Otherwise, we’ll query all the data at once and send it to the client in one go.
Once we have both the naive and the streaming solutions in place, we’ll conduct a concurrent load test. This test will simulate the conditions of multiple users triggering the CSV export simultaneously, thus creating a scenario to examine how both methods handle high demand and measure their memory footprint.
The Results
After crafting both solutions and setting up our concurrent load test, we finally had a chance to observe these methods in action. As the users piled on and the CSV export requests started rolling, we kept a close eye on the memory footprint of both approaches. Now, it’s time to reveal the results!
I spent 3 hours looking for the sweet spot that could demonstrate the difference between the two solutions. I found that it is 100 concurrent requests on a 256MB instance. The result? The naive solution stopped responding after some requests, while the streaming solution just keep on going with the available memory. I tested it using ApacheBench, and here are the results:
Naive solution
ab -n 100 -c 100 "http://0.0.0.0:3000/api/7/export"                                          08:13:42
This is ApacheBench, Version 2.3 <$Revision: 1879490 $>
Copyright 1996 Adam Twiss, Zeus Technology Ltd, http://www.zeustech.net/
Licensed to The Apache Software Foundation, http://www.apache.org/

Benchmarking 0.0.0.0 (be patient).....done


Server Software:
Server Hostname:        0.0.0.0
Server Port:            3000

Document Path:          /api/7/export
Document Length:        1395000 bytes

Concurrency Level:      100
Time taken for tests:   5.523 seconds
Complete requests:      100
Failed requests:        90
   (Connect: 0, Receive: 0, Length: 90, Exceptions: 0)
Non-2xx responses:      90
Total transferred:      13962570 bytes
HTML transferred:       13951890 bytes
Requests per second:    18.11 [#/sec] (mean)
Time per request:       5522.533 [ms] (mean)
Time per request:       55.225 [ms] (mean, across all concurrent requests)
Transfer rate:          2469.03 [Kbytes/sec] received

Connection Times (ms)
              min  mean[+/-sd] median   max
Connect:        0    2   0.4      2       2
Processing:   358 4952 714.5   5147    5175
Waiting:      345 4949 720.1   5146    5175
Total:        358 4953 714.4   5149    5177

Percentage of the requests served within a certain time (ms)
  50%   5149
  66%   5159
  75%   5163
  80%   5168
  90%   5175
  95%   5176
  98%   5177
  99%   5177
 100%   5177 (longest request)
Streaming solution
 ab -n 100 -c 100 "http://0.0.0.0:3000/api/7/export?stream=true"                              08:16:32
This is ApacheBench, Version 2.3 <$Revision: 1879490 $>
Copyright 1996 Adam Twiss, Zeus Technology Ltd, http://www.zeustech.net/
Licensed to The Apache Software Foundation, http://www.apache.org/

Benchmarking 0.0.0.0 (be patient).....done


Server Software:
Server Hostname:        0.0.0.0
Server Port:            3000

Document Path:          /api/7/export?stream=true
Document Length:        1395000 bytes

Concurrency Level:      100
Time taken for tests:   19.448 seconds
Complete requests:      100
Failed requests:        0
Total transferred:      139519600 bytes
HTML transferred:       139500000 bytes
Requests per second:    5.14 [#/sec] (mean)
Time per request:       19447.933 [ms] (mean)
Time per request:       194.479 [ms] (mean, across all concurrent requests)
Transfer rate:          7005.87 [Kbytes/sec] received

Connection Times (ms)
              min  mean[+/-sd] median   max
Connect:        0    1   0.3      1       2
Processing:  6323 18583 1262.9  18641   18962
Waiting:      344 1207 504.6    914    2349
Total:       6324 18585 1263.0  18643   18963

Percentage of the requests served within a certain time (ms)
  50%  18643
  66%  18786
  75%  18877
  80%  18888
  90%  18950
  95%  18960
  98%  18962
  99%  18963
 100%  18963 (longest request)
As you can see, the streaming solution might take longer to finish, but it will finish. The naive solution, on the other hand, will stop responding after a while. This is because the naive solution will try to consume all the available memory, even when no more memory is available. The streaming solution, on the other hand, will wait for the memory to be available before continuing, thus preventing the server from crashing. But how do I know this? I tested it using the docker stats command, and here are the results:
ab -n 100 -c 100 "http://0.0.0.0:3000/api/7/export"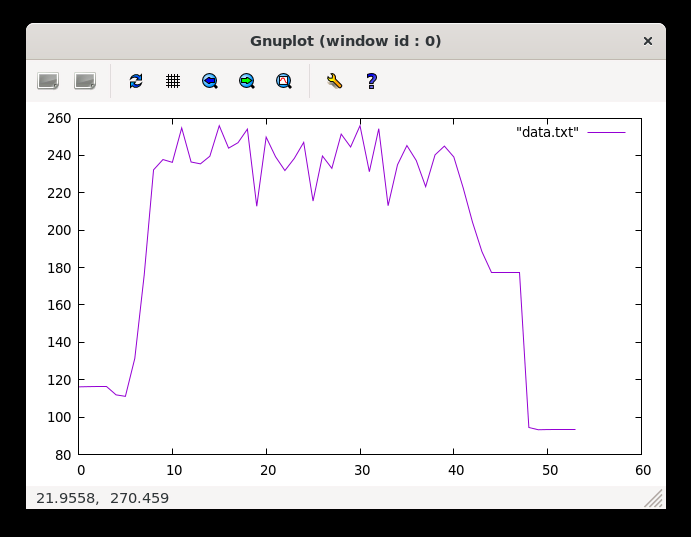
I’m actually impressed, this time it did not go boom. But it did hit the ceiling like multiple times, and it took a while to finish. Lets push it a little bit more.
ab -n 200 -c 200 "http://0.0.0.0:3000/api/7/export"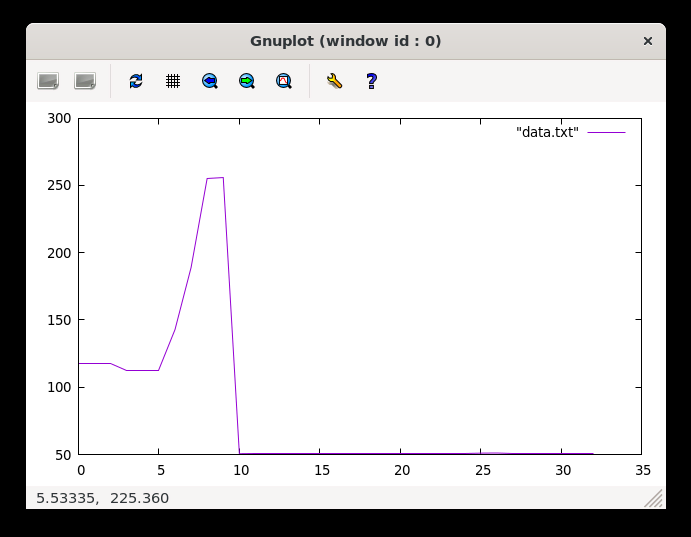
Yeah it went boom in a few seconds. And what was the error message? It was Error: socket hang up. Not very helpful, but I think it’s because the server ran out of memory. Let me know if you have a better clue. Now, let’s try the streaming solution.
ab -n 100 -c 100 "http://0.0.0.0:3000/api/7/export?streaming=true"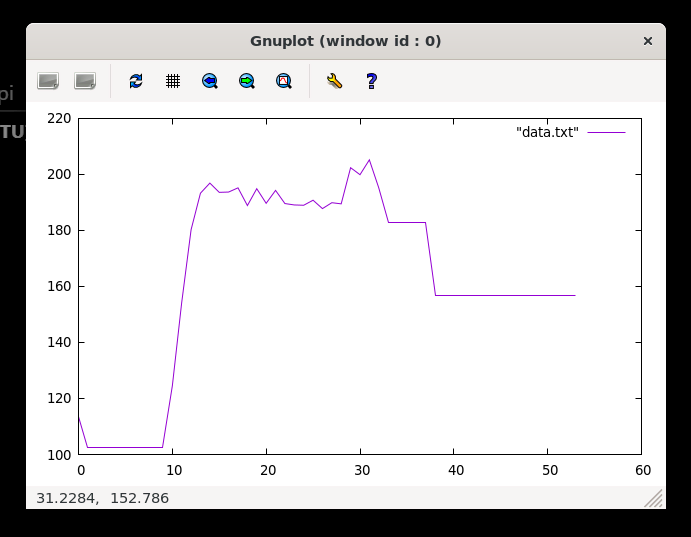
It barely hit 200MB, and it took a while to finish. Let’s push it a little bit more.
ab -n 200 -c 200 "http://0.0.0.0:3000/api/7/export?streaming=true"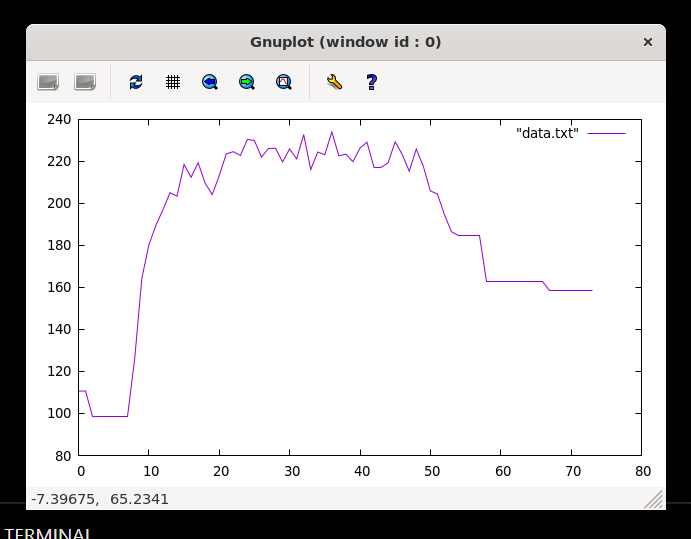
Still won’t kaboom, and still below 240MB, still a headroom. Let’s see if we can hit the ceiling.
ab -n 300 -c 300 "http://0.0.0.0:3000/api/7/export?streaming=true"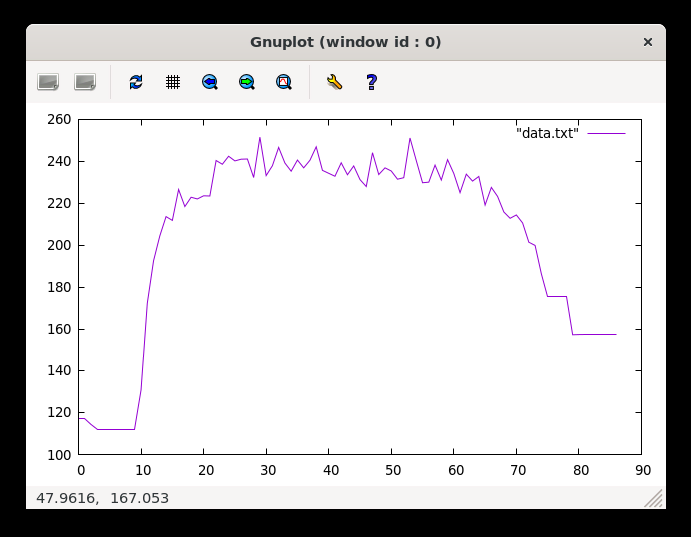
Hit the ceiling twice, but still won’t kaboom. Good enough for me, but if you want to test it further, feel free to do so.
Wrap Up
In this article, we explored the journey of building an efficient data export feature with Hasura, TypeScript, and Next.js. By using the streaming approach, we were able to build a robust solution that could handle large, concurrent CSV exports without bringing the server down to its knees and no cloud storage services required. I hope you find this article helpful.